05. Exercise: Create Custom View
21 4 AAK Create Custom View SC-Slide Part 1
Exercise
In this exercise you are going to create a custom view.
Create a Kotlin app called
CustomFanControllerusing the Empty Activity template. Make sure the package name iscom.example.android.customfancontroller.If there is not one, create a
dimens.xmlfile in the values folder.Open
dimens.xmland add the following dimensions:
<resources>
   <dimen name="text_view_padding">16dp</dimen>
   <dimen name="default_margin">8dp</dimen>
   <dimen name="margin_top">24dp</dimen>
   <dimen name="fan_dimen">250dp</dimen>
</resources>- Open
strings.xmland add the following resources. Notice that you have a title for the fan, and settings for the dial.
<resources>
   <string name="app_name">CustomFanController</string>
   <string name="fan_control">Fan Control</string>
   <string name="fan_off">off</string>
   <string name="fan_low">1</string>
   <string name="fan_medium">2</string>
   <string name="fan_high">3</string>
</resources>
Open
activity_main.xmlin the Text tab to edit the XML code.Replace the existing
TextViewwith this code. This text acts as a label in the activity for the custom view. You'll extract dimensions and strings later in this step.
<TextView
       android:id="@+id/customViewLabel"
       android:textAppearance="@style/Base.TextAppearance.AppCompat.Display3"
       android:layout_width="wrap_content"
       android:layout_height="wrap_content"
       android:padding="@dimen/text_view_padding"
       android:textColor="@android:color/black"
       android:layout_marginStart="@dimen/default_margin"
       android:layout_marginEnd="@dimen/default_margin"
       android:layout_marginTop="@dimen/margin_top"
       android:text="@string/fan_control"
       app:layout_constraintLeft_toLeftOf="parent"
       app:layout_constraintRight_toRightOf="parent"
app:layout_constraintTop_toTopOf="parent"/>- Add this
ImageViewelement to the layout. This is a placeholder for the custom view you will create in this lesson.
<ImageView
       android:id="@+id/dialView"
       android:layout_width="200dp"
       android:layout_height="200dp"
       android:background="@android:color/darker_gray"
       app:layout_constraintTop_toBottomOf="@+id/customViewLabel"
       app:layout_constraintLeft_toLeftOf="parent"
       app:layout_constraintRight_toRightOf="parent"
       android:layout_marginLeft="@dimen/default_margin"
       android:layout_marginRight="@dimen/default_margin"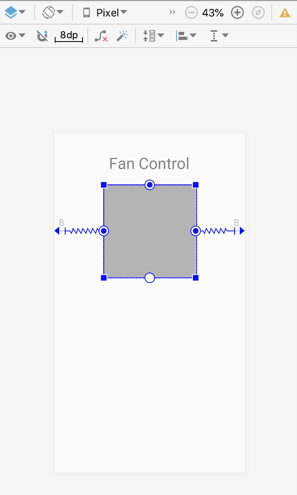
android:layout_marginTop="@dimen/default_margin"/>- Click the Design tab. The layout should look like this:
Create a new Kotlin class called
DialView.Modify the class definition to extend
View. Importandroid.view.Viewwhen prompted.Click on
Viewand then click the red bulb. Choose Add Android View constructors using '@JvmOverloads'. Android Studio adds the constructor from the View class. The @JvmOverloads annotation instructs the Kotlin compiler to generate overloads for this function that substitute default parameter values.
class DialView @JvmOverloads constructor(
   context: Context,
   attrs: AttributeSet? = null,
   defStyleAttr: Int = 0
) : View(context, attrs, defStyleAttr) {
}- Above the
DialViewclass definition, just below the imports, add a top-level enum to represent the available fan speeds. Note that thisenumis of typeIntbecause the values are string resources rather than actual strings.
private enum class FanSpeed(val label: Int) {
   OFF(R.string.fan_off),
   LOW(R.string.fan_low),
   MEDIUM(R.string.fan_medium),
   HIGH(R.string.fan_high);
}- Below the
enum, add these constants. You'll use these as part of drawing the dial indicators and labels.
private const val RADIUS_OFFSET_LABEL = 30
private const val RADIUS_OFFSET_INDICATOR = -35- Inside the
DialViewclass, define several variables you need in order to draw the custom view. Importandroid.graphics.PointFif requested.
private var radius = 0.0f                   // Radius of the circle.
private var fanSpeed = FanSpeed.OFF         // The active selection.
// position variable which will be used to draw label and indicator circle position
private val pointPosition: PointF = PointF(0.0f, 0.0f)
The
radiusis the current radius of the circle. This value is set when the view is drawn on the screen.The
fanSpeedis the current speed of the fan, which is one of the values in theFanSpeedenumeration. By default that value isOFF.Finally
pointPositionis an X,Y point that will be used for drawing several of the view's elements on the screen.
These values are created and initialized here instead of when the view is actually drawn to ensure that the actual drawing step runs as fast as possible.
- Inside the
DialViewclass definition, initialize aPaintobject with a handful of basic styles. Importandroid.graphics.Paintandandroid.graphics.Typefacewhen requested. As with the variables, these styles are initialized here to help speed up the drawing step.
private val paint = Paint(Paint.ANTI_ALIAS_FLAG).apply {
   style = Paint.Style.FILL
   textAlign = Paint.Align.CENTER
   textSize = 55.0f
   typeface = Typeface.create( "", Typeface.BOLD)
}